原文地址:https://www.sitepoint.com/creating-crud-app-minutes-angulars-resource
大量的单页应用都有CRUD操作。如果你使用angularjs创建一个CRUD操作,那么你可以利用$resource服务的优势。$resource服务是建立在$http服务之上,并且可以使前后端用RESTful标准进行交互变得简单的一个factory。所以,我们一起探索一下$resource,并且在angular中实现CRUD的操作。
前提 $resource服务没有打包到angularjs中。你需要下载一个独立的文件叫angular-resource.js并且把它引入到HTML页面中。这个文件可以从这里下载:http://cdnjs.cloudflare.com/ajax/libs/angular.js/1.2.16/angular-resource.min.js 。
另外,为了使用$resource你需要在主模块中注入ngResource模块。示例:
1
angular.module('mainApp' ,['ngResource' ]);
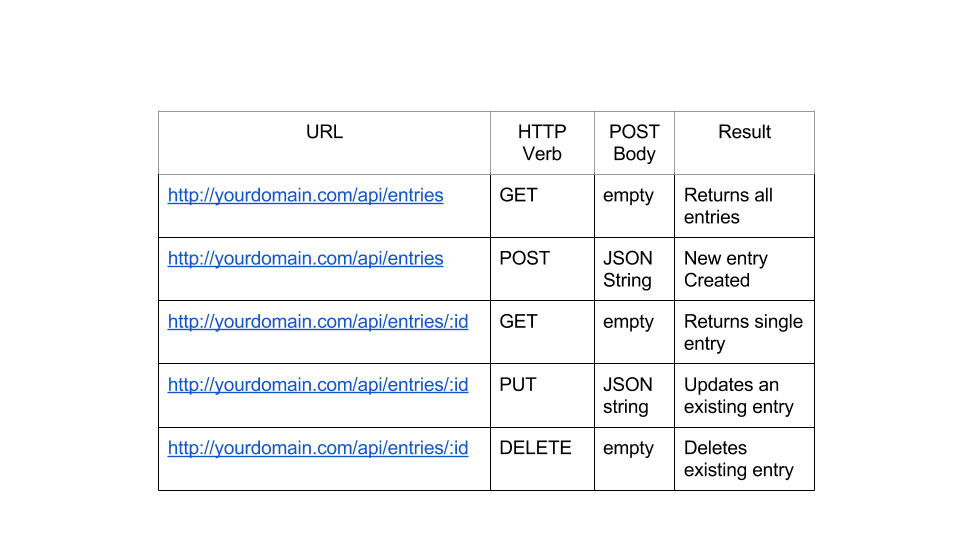
入门 $resource和 RESTful API工作。这意味着你的 URLs 应该类似于下面的模式:
你可以创建接口使用你选择的服务器端语言。我使用的是Node + Express + MongoDB为这个示例应用设计RESTful接口。创建好了这些URLs以后,你就可以借助于$resource与这些URLs交互。我们来看一下$resource实际上是怎么工作的。
$resource是怎么工作的? 在controller/service中使用$resource需要先声明依赖。接下来就像下面的示例一样,在REST端调用$resource()方法。调用方法之后返回一个$resource一个可用于与REST后端交互的资源类:1
2
3
angular.module('myApp.services' ).factory('Entry' , function ($resource )
return $resource('/api/entries/:id' );
});
方法返回的是一个资源类对象,默认包含下面5种方法:
get()query()save()remove()delete()
下面我们看一下如何在controller中使用get(),query()和save()方法:
1
2
3
4
5
6
7
8
9
10
11
12
13
14
15
16
17
18
angular.module('myApp.controllers' ,[]);
angular.module('myApp.controllers' ).controller('ResourceController' ,function ($scope, Entry )
var entry = Entry.get({ id : $scope.id }, function (
console .log(entry);
});
var entries = Entry.query(function (
console .log(entries);
});
$scope.entry = new Entry();
$scope.entry.data = 'some data' ;
Entry.save($scope.entry, function (
});
});
在上面的代码片段中 get()方法发起/api/entries/:id的 get 请求。参数:id在被替换为$scope.id。注意get()方法返回一个空对象,当实际数据从服务器返回的时候自动填充到这个空对象。get()方法的第二个参数是回调方法,当服务器端返回数据的时候执行该回调。这是一个非常有用的技巧,因为你可以设置get()返回一个空对象,挂载到$scope,绑定视图。当真实的数据返回且填充到对象,双向数据绑定触发,并且更新视图。
query()方法发起/api/entries(注意这里没有:id)的 get请求 并返回一个空数组。当服务器端返回数据时候填充到该数组。将该数组继续挂在到$scope的模型上,并且在视图上使用ng-repeat绑定。你也可以给query()传递一个回调方法,在数据从服务前端返回的时候执行。
save()方法发起/api/entries的 post 请求, 第一个参数是 post body。第二个参数为回调方法,当数据保存成功后执行。你应该记得$resource()方法返回的是一个资源类。所以,在我们的用例中,我们可以调用new Entry()实例化一个真正的对象,设置若干个属性给它,最后将该对象保存到后端。
假设你只使用get()和query()在resource类上(在我们的例子中resource类是Entry)。所有非 get 请求的方法,例如save()和delete()在new Entry()实例中都能用(在这里称为$resource实例)。不同的是这些方法都以$的开头。所以这些有用的方法为:
$save()$delete()$remove
例如,$save()方法像下面一样使用:
1
2
3
4
$scope.entry = new Entry();
$scope.entry.$save(function (
});
我们已经实践CRUD中的了增加,查找和删除,剩下的最后一个修改。为了支持修改操作,我们需要像下面这样修改我们的Entryfactory:1
2
3
4
5
6
7
angular.module('myApp.services' ).factory('Entry' , function ($resource )
return $resource('/api/entries/:id' , { id : '@_id' }, {
update : {
method : 'PUT'
}
});
});
$resource的第二个 argument 明确标识需要url中:id参数的值是什么。这里将其设置为@_id,这意味着在$resource的实例中不管什么时候调用方法例如$update()和$delete(),:id的都会被设置为实例中_id的属性值。这个是为 PUT 和 DELETE 请求使用的。注意第三个 argument,它允许我们给资源类添加自定义方法。如果该方法是一个非 get 请求,在$resource会有一个以$的同名方法。我们看一下如何使用$update方法。假设我们在controller中使用:
1
2
3
4
5
6
7
$scope.entry = Movie.get({ id : $scope.id }, function (
$scope.entry.data = 'something else' ;
$scope.entry.$update(function (
});
});
当$update()方法调用的时候,过程如下:
Angularjs 知道$update()方法会触发 URL 为/api/entries/:id的 PUT 请求。
读取$scope.entry._id值,将此值赋给:id并且生成 URL。
发起一个请求体为 $scope.entity的 PUT 请求。
同样,如果你想删除一个entry可以像下面这么做:
1
2
3
4
5
6
7
$scope.entry = Movie.get({ id : $scope.id }, function (
$scope.entry.data = 'something else' ;
$scope.entry.$delete (function (
});
});
它和 update 有着同样的步骤,只是使用 DELETE 替换了 PUT请求类型。
我们已经覆盖了CRUD的所有操作,但是还有一小点。$resource方法还有第4个可选择的参数。这是一个自定义设置的值。目前只有一个 stripTrailingSlashes可以设置。它的默认值是false,这意味着它会自动删除 URL 的最后一个 /,如果你不需要可以像下面这么做:
1
2
3
4
5
6
7
8
9
angular.module('myApp.services' ).factory('Entry' , function ($resource )
return $resource('/api/entries/:id' , { id : '@_id' }, {
update : {
method : 'PUT'
}
}, {
stripTrailingSlashes : false
});
});
顺便说一句,我没有覆盖$resource相关的每一个东西。我们这里介绍的是最基本的,这将帮助您很快的开始一个应用的 CRUD。如果你仔细研究$resource,你可以阅读这篇文章 。
创建一个Movie的应用 为了加强$resource的概念我们为电影爱好者创建一个应用。这是一个单页应用,用户可以新增一个电影,修改一个已存在的,最后还可以删除。我们将使用$resource与后端 REST API 进行交互。你可以查看这个在线例子,我们将它部署在这里 。
注意API允许CROS访问(跨域资源共享),所以你可以创建一个独立的 Angular 应用,可以使用 http://movieapp-sitepointdemos.rhcloud.com/ 地址为API。你可以开发 Angular 应用不用担心没有后端服务。
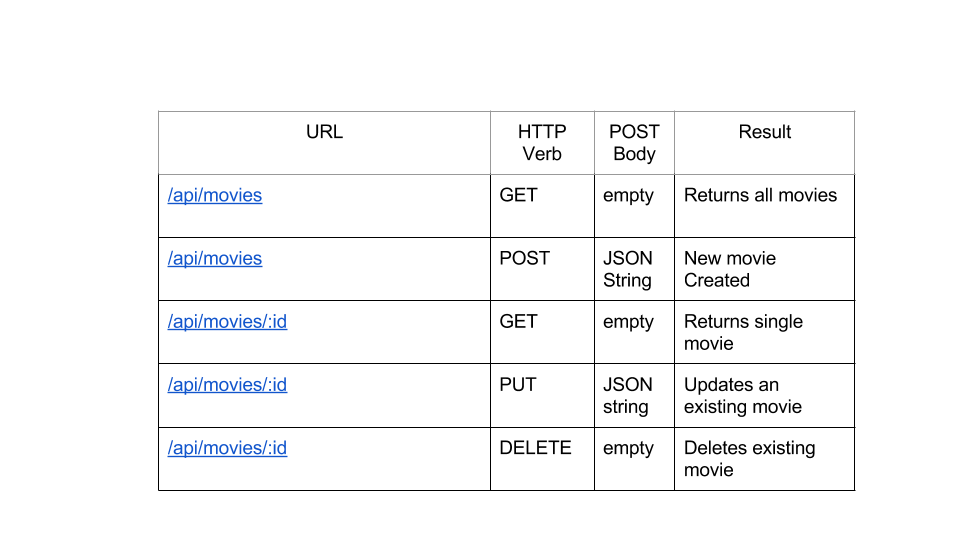
API 我已经使用 Node 和 Express创建了一个 RESTful 后端服务。看下面的截图认识一下API接口:
目录结构 我们的 AngularJS 应用采用下面的目录结构:1
2
3
4
5
6
7
8
9
10
11
12
13
14
15
16
17
18
19
movieApp
/css
bootstrap.css
app.css
/js
app.js
controllers.js
services.js
/lib
angular.min.js
angular-resource.min.js
angular-ui-router.min.js
/partials
_form.html
movie-add.html
movie-edit.html
movie-view.html
movies.html
index.html
注意到我们的路由使用Angular UI Router 实现
创建 service 与REST后端交互 像上面部分讨论的一样,我们创建一个标准的 service 使用$resource与后端 REST API 交互。这个服务定义在js/services.js中。
services.js
1
2
3
4
5
6
7
angular.module('movieApp.services' , []).factory('Movie' , function ($resource )
return $resource('http://movieapp-sitepointdemos.rhcloud.com/api/movies/:id' , { id : '@_id' }, {
update : {
method : 'PUT'
}
});
});
这个 factory 的名字是 Movie. 我们使用的是 MongoDB,每个 movie 实例都有一个_id的属性。rest是简单而直接的。
现在我们已经开发好了 service,我们接下来开发 views 和 controllers。
index.html:创建应用的入口页面index.html是我们应用的入口。我们需要将所有依赖的 scripts 和 css全部引入到页面。我们使用 Bootstrap 来快速的开始布局。下面是index.html的内容:
1
2
3
4
5
6
7
8
9
10
11
12
13
14
15
16
17
18
19
20
21
22
23
24
25
26
27
28
29
30
31
32
33
34
35
36
37
38
39
<!DOCTYPE html>
<html data-ng-app ="movieApp" >
<head lang ="en" >
<meta charset ="utf-8" >
<meta http-equiv ="X-UA-Compatible" content ="IE=edge" >
<meta name ="viewport" content ="width=device-width, initial-scale=1" >
<base href ="/" />
<title > The Movie App</title >
<link rel ="stylesheet" type ="text/css" href ="css/bootstrap.min.css" />
<link rel ="stylesheet" type ="text/css" href ="css/app.css" />
</head >
<body >
<nav class ="navbar navbar-default" role ="navigation" >
<div class ="container-fluid" >
<div class ="navbar-header" >
<a class ="navbar-brand" ui-sref ="movies" > The Movie App</a >
</div >
<div class ="collapse navbar-collapse" >
<ul class ="nav navbar-nav" >
<li class ="active" > <a ui-sref ="movies" > Home</a > </li >
</ul >
</div >
</div >
</nav >
<div class ="container" >
<div class ="row top-buffer" >
<div class ="col-xs-8 col-xs-offset-2" >
<div ui-view > </div >
</div >
</div >
</div >
<script type ="text/javascript" src ="lib/angular.min.js" > </script >
<script type ="text/javascript" src ="js/app.js" > </script >
<script type ="text/javascript" src ="js/controllers.js" > </script >
<script type ="text/javascript" src ="js/services.js" > </script >
<script type ="text/javascript" src ="lib/angular-ui-router.min.js" > </script >
<script type ="text/javascript" src ="lib/angular-resource.min.js" > </script >
</body >
</html >
标签没什么特别需要说明的。需要注意的是<div ui-view></div>,ui-view指令来源于 UI Router模块,并且作为我们视图的容器。
创建主 Module 和 States 我们主module和 states定义在js/app.js中:
app.js:
1
2
3
4
5
6
7
8
9
10
11
12
13
14
15
16
17
18
19
20
21
22
angular.module('movieApp' , ['ui.router' , 'ngResource' , 'movieApp.controllers' , 'movieApp.services' ]);
angular.module('movieApp' ).config(function ($stateProvider )
$stateProvider.state('movies' , {
url: '/movies' ,
templateUrl : 'partials/movies.html' ,
controller : 'MovieListController'
}).state('viewMovie' , {
url: '/movies/:id/view' ,
templateUrl : 'partials/movie-view.html' ,
controller : 'MovieViewController'
}).state('newMovie' , {
url: '/movies/new' ,
templateUrl : 'partials/movie-add.html' ,
controller : 'MovieCreateController'
}).state('editMovie' , {
url: '/movies/:id/edit' ,
templateUrl : 'partials/movie-edit.html' ,
controller : 'MovieEditController'
});
}).run(function ($state )
$state.go('movies' );
});
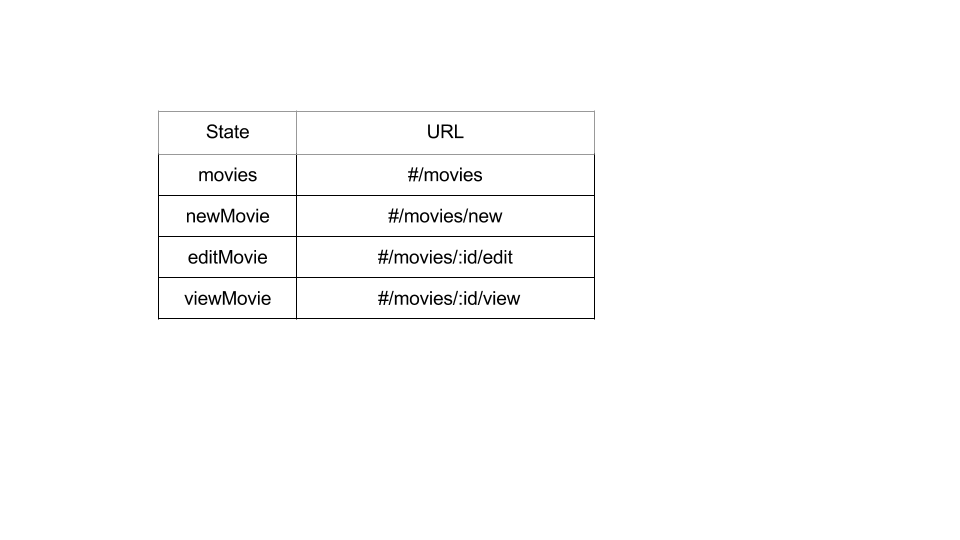
所以,我们的应用有以下4种状态:
moviesviewMovienewMovieeditMovie
每一个state由url,templateUrl和controller组成。注意到当主模块加载的时候路由转向 movies去展示我们系统中所有的movies。下面的截图看一看出每个路由对应的url是什么。
创建模板 所有的模板都在partials目录下,我们挨个来看一下他们的内容。
_form.html是一个让用户录入数据的的简单表单。注意到这个表单会被movie-add.html和movie-edit.html引入,因为它们都需要用户输入。
下面是_form.html的内容:1
2
3
4
5
6
7
8
9
10
11
12
13
14
15
16
17
18
19
20
21
22
23
24
25
26
27
28
29
<div class ="form-group" >
<label for ="title" class ="col-sm-2 control-label" > Title</label >
<div class ="col-sm-10" >
<input type ="text" ng-model ="movie.title" class ="form-control" id ="title" placeholder ="Movie Title Here" />
</div >
</div >
<div class ="form-group" >
<label for ="year" class ="col-sm-2 control-label" > Release Year</label >
<div class ="col-sm-10" >
<input type ="text" ng-model ="movie.releaseYear" class ="form-control" id ="year" placeholder ="When was the movie released?" />
</div >
</div >
<div class ="form-group" >
<label for ="director" class ="col-sm-2 control-label" > Director</label >
<div class ="col-sm-10" >
<input type ="text" ng-model ="movie.director" class ="form-control" id ="director" placeholder ="Who directed the movie?" />
</div >
</div >
<div class ="form-group" >
<label for ="plot" class ="col-sm-2 control-label" > Movie Genre</label >
<div class ="col-sm-10" >
<input type ="text" ng-model ="movie.genre" class ="form-control" id ="plot" placeholder ="Movie genre here" />
</div >
</div >
<div class ="form-group" >
<div class ="col-sm-offset-2 col-sm-10" >
<input type ="submit" class ="btn btn-primary" value ="Save" />
</div >
</div >
模板中使用ng-model绑定不同的movie变量属性到不同的scope的movie模型。
movie-add.html:这个模板接收用户输入并且在我们的系统中保存一个新的movie,下面是具体内容:1
2
3
<form class ="form-horizontal" role ="form" ng-submit ="addMovie()" >
<div ng-include ="'partials/_form.html'" > </div >
</form >
当表单提交的时候,会触发scope 的 addMovie()方法向后端发送一个创建movie的POST请求。
movie-edit.html:这个模板用于接收用户收入,并且修改系统在已存在的一个movie。1
2
3
<form class ="form-horizontal" role ="form" ng-submit ="updateMovie()" >
<div ng-include ="'partials/_form.html'" > </div >
</form >
这个表单一旦提交,就会触发scope的 updateMovie()方法像向后端发送一个 PUT 请求去修改movie信息。
movie-view.html::这个模板用于展示一个movie的详细信息。内容如下:1
2
3
4
5
6
7
8
9
10
11
12
13
14
15
16
17
18
19
20
21
22
23
24
25
<table class ="table movietable" >
<tr >
<td > <h3 > Details for {{movie.title}}</h3 > </td >
<td > </td >
</tr >
<tr >
<td > Movie Title</td >
<td > {{movie.title}}</td >
</tr >
<tr >
<td > Director</td >
<td > {{movie.director}}</td >
</tr >
<tr >
<td > Release Year</td >
<td > {{movie.releaseYear}}</td >
</tr >
<tr >
<td > Movie Genre</td >
<td > {{movie.genre}}</td >
</tr >
</table >
<div >
<a class ="btn btn-primary" ui-sref ="editMovie({id:movie._id})" > Edit</a >
</div >
模板最后是一个编辑按钮。点击按钮路由会转向编辑状态,并且当前编辑的movie id 会包含在$stateParams中。
movies.html:这个模板用于展示系统中所有的 movie。
1
2
3
4
5
6
7
8
9
10
11
12
13
14
<a ui-sref ="newMovie" class ="btn-primary btn-lg nodecoration" > Add New Movie</a >
<table class ="table movietable" >
<tr >
<td > <h3 > All Movies</h3 > </td >
<td > </td >
</tr >
<tr ng-repeat ="movie in movies" >
<td > {{movie.title}}</td >
<td >
<a class ="btn btn-primary" ui-sref ="viewMovie({id:movie._id})" > View</a >
<a class ="btn btn-danger" ng-click ="deleteMovie(movie)" > Delete</a >
</td >
</tr >
</table >
通过循环展示后端返回的每个movie对象的详细详细。这个也有一个添加按钮可以将路由转向添加状态,触发它可以转向一个新的页面并且添加一个新的movie。
在每个movie后面都有两个操作按钮,分别是查看和删除。查看可以转向movie的详细信息页面。删除会将movie永久的删除掉。
创建controllers 每一个路由都对应一个controller。所以,我们总共有4个controller对应4个路由。所有的controller都在js/controllers.js中。所有的controllers都是调用我们上面讨论的Movie service服务。下面看一下controllers如何调用:
controllers.js:
1
2
3
4
5
6
7
8
9
10
11
12
13
14
15
16
17
18
19
20
21
22
23
24
25
26
27
28
29
30
31
32
33
angular.module('movieApp.controllers' , []).controller('MovieListController' , function ($scope, $state, popupService, $window, Movie )
$scope.movies = Movie.query();
$scope.deleteMovie = function (movie )
if (popupService.showPopup('Really delete this?' )) {
movie.$delete (function (
$window .location.href = '' ;
});
}
};
}).controller('MovieViewController' , function ($scope, $stateParams, Movie )
$scope.movie = Movie.get({ id : $stateParams.id });
}).controller('MovieCreateController' , function ($scope, $state, $stateParams, Movie )
$scope.movie = new Movie();
$scope.addMovie = function (
$scope.movie.$save(function (
$state.go('movies' );
});
};
}).controller('MovieEditController' , function ($scope, $state, $stateParams, Movie )
$scope.updateMovie = function (
$scope.movie.$update(function (
$state.go('movies' );
});
};
$scope.loadMovie = function (
$scope.movie = Movie.get({ id : $stateParams.id });
};
$scope.loadMovie();
});
总结 假设应用部署在localhost/movieApp,你可以通过http://localhost/movieApp/index.html访问。如果你是一个电影爱好者,你也可以在里面添加你喜爱的电影。部署和这篇文章中用到的源码可以在GitHub进行下载。